


Tell me if this sounds familiar: You just moved in or are looking for a new home, you started shopping around online, you made Pinterest & Houzz inspiration boards, you bookmarked all your favorite items, you watched reruns of HGTV shows, you took notes from a YouTube video on how to DIY everything, and you have been stock piling coupons for Bed Bath and Beyond like nobody's business. You did the research and you gathered inspiration but where do you start? I’m here to tell you how in this blog post!
10 Holiday Gift Wrap Ideas
'Tis the season to be giving! And with that, comes the gift wrapping. Add style and personalize your presents with these decorating ideas. I'm a little last minute with my gift shopping this year so I will be sharing 10 of my favorite gift-wrapping ideas from Pinterest. I love wrapping gifts. I find it so therapeutic. I take the time to fold the corners real crisp. I take gift wrapping seriously. I used to work at Pier1 Imports and I was the cashier who could wrap any gift, any shape, any size with ease.
I will be sharing my gift wrapping techniques on Instagram so follow along to see what ideas I come up with.
Black, White, & Gold - My favorite glam color scheme. My favorite gifts have the bells hanging from them and of course the big full bows. For more gift wrapping ideas, head over to Boxwood Clippings blog.

Rustic Red and White - Mix craft paper and wrapping paper for a layered look. Mix in Christmas Clippings for a Natural touch and the person's initial for personalization. You could also add an ornament for a little more sparkle. For the tutorial visit, On Sutton Place blog.

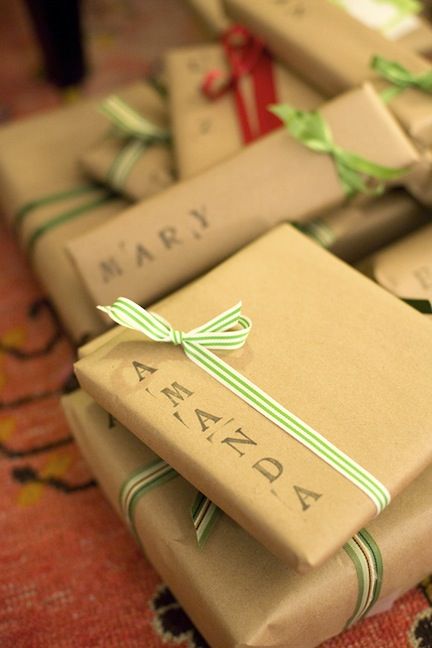
Stamp it - Personalize brown paper with alphabet stampers with each individual's name for a homemade touch or stamp some holiday cheer with the word "joy". For more gift wrapping ideas, visit Babble.com
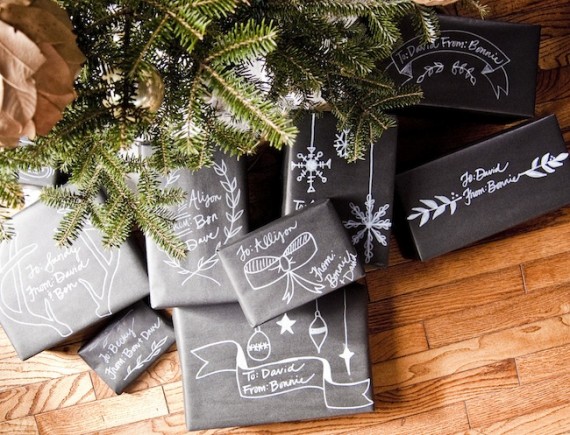
Chalkboard Packaging - Wrap your presents in black craft paper and draw with white pencil or paint pens to give the look and feel of Chalkboard presents. For the tutorial, visit Going Home to Roost blog.
For the Traveler - wrap your gift with a recycled map or Atlas. Bonus points for using a map with a place that actually traveled too. For the tutorial, visit Lime Doodle Design.

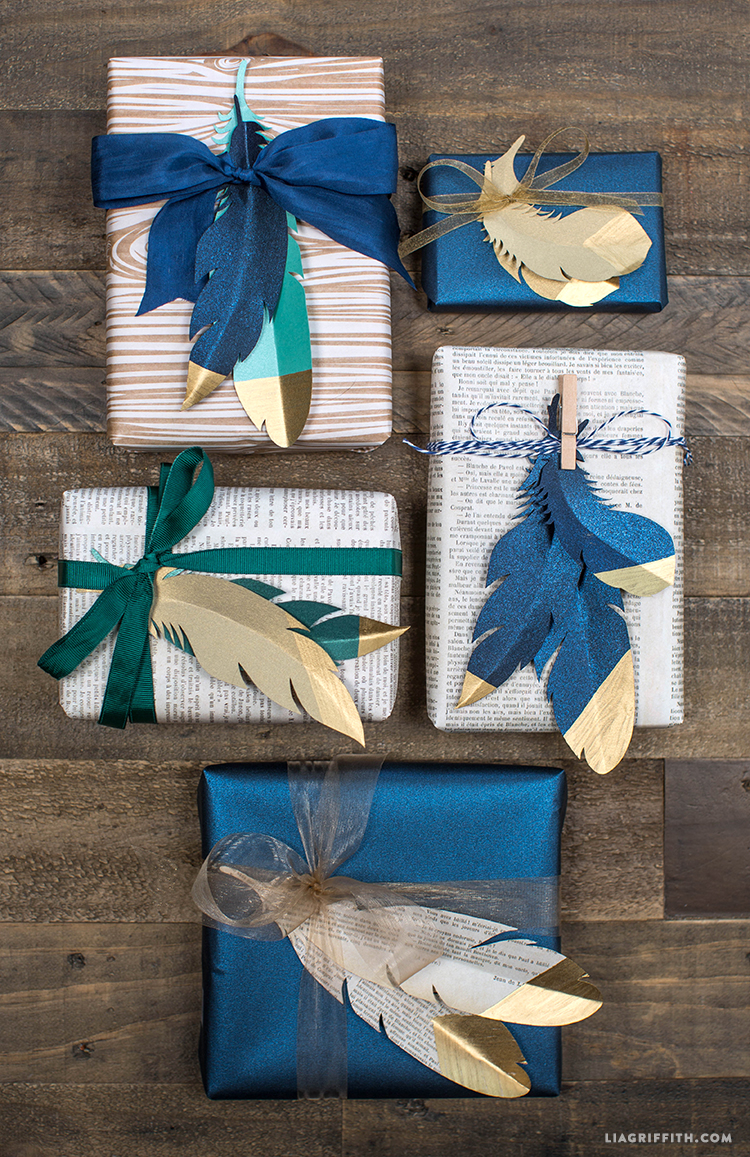
Gold Tipped Paper Feathers - No bow? No problem. Create a feather pattern out of colored construction paper or even a newspaper. Add a little glam by spraying your faux feather with gold spray paint. For the full tutorial, please visit Lia Griffith.
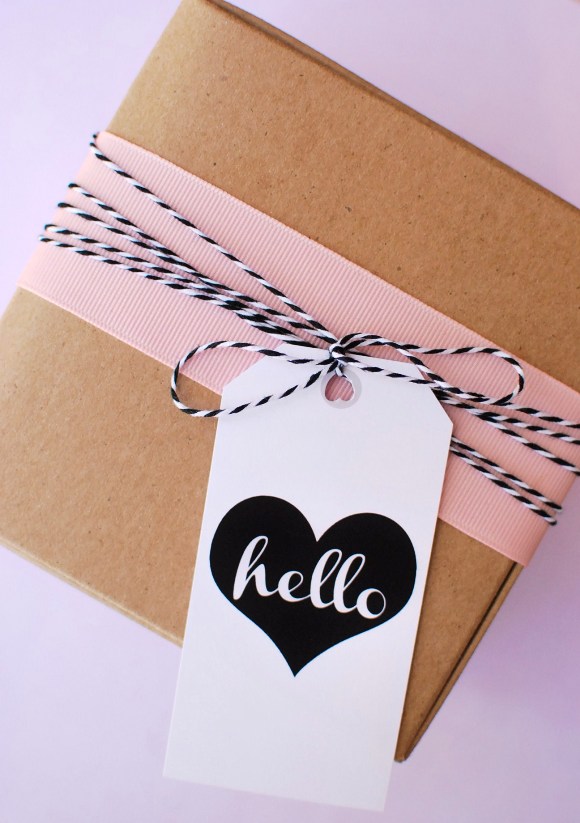
Girlie Gifts and Gift Tags - Simple yet adorable. One single ribbon for a pop of color and then black and white string to hold the decorative tag. For free graphic gift tag printables, visit Birds Party blog.
Sticker it! - Cover your package with craft paper, wrap with raffia, and apply holiday stickers of your choice. For the tutorial, check out Midwest Living.

Boxwood Wreath - I love boxwood plants. For a rustic yet holiday gift wrap idea, use boxwood branches and burlap. For the tutorial, visit Craftberry Bush blog.

For the bookworm - Wrap small gifts with bookpages and add a monogram for each of your friends. I would take this gift wrap technique one step further by adding a mini candy cane or fake holly berries for a holiday touch. Tutorial via Erinnish.

Are you behind on your holiday shopping like me? These gift wrapping ideas are simple and will make your friends/family feel special when they open them. Which Holiday gift wrap idea will you choose?
Are you a gift-wrapping fanatic like I am? Tag @byamadesigns on Instagram so I can check out your holiday gifts ! I would love to see them.
Happy Holidays Everyone!
Want more design ideas? Join "The Designed Life" monthly e-magazine filled with inspiration for the home and life. Receive a free Home Design Shopping Guide as a gift when you join.
How to Shop for Furniture
Are you ready to redecorate your space but not sure where to start? Well - I am glad your here! In today's Tip Tuesday post you will learn how to shop for furniture, how to assess your needs, what to look out for when shopping for new furniture, and how to avoid mistakes.
How to Shop for Furniture: Where to Begin
Assess Belongings - Before you go shopping, create a note of what existing items are staying, going, and what new items are needed/desired. Assess what is worth keeping and what items you are ready to let go. Also keep in mind the furniture that is in good condition but may need to be freshened up by reupholstering or refinishing with a new coat of paint.
Create a Cheat Sheet - Goto the store prepared by bring clippings of paint colors, fabrics samples, and pictures of items you are working with. Bring inspiration photos to glance at while shopping to remind you of how you want the end result to look and feel. Shopping can be overwhelming and it's easy to get distracted. Bringing a cheat sheet while shopping keeps you on target.
Plan Ahead - Measure your existing space and items that you will be keeping. Draw the general shape of your room and see if you could reconfigure the layout in a way that works best for you. Now is the time to nail down the details of what size furniture works best.
* Side Note: Measure all important doorways/entrys and hallways to confirm furniture can fit into the space. Nothing worse than buying furniture that can't fit through the door.
Scale - This ties in with measuring... A piece of furniture may look great in a showroom with high ceilings but when you bring it back home, it may overwhelm your space. Measure the space and tape out and block the furniture on the floor to make sure it fits in the room before you buy it.
Budget - Create a spending plan of how much you want to spend in total. Do not forget to factor in additional fees such as warranties, protection plans, installation/assembly, and inside deliveries.
Additional Tips:
- When purchasing upholstery, upgrade seat cushions to foam wrapped with down. Invest in pieces that are most important (i.e. the sofa) instead of rarely used items. The heavier the cushion, the longer it will last.
- Furniture is a large investment. Select furniture that is timeless and transitional.
- For case goods, look for dovetail joints in the corners of drawers for long-lasting quality.
- For upholstery, lift up a corner and shake it, if it feels light or wobbly; skip it.
Want more design tips? Join "The Designed Life" monthly e-magazine, filled with tons of inspiration for the home and life. Also, receive a free Home Design Checklist when you join.
Receive a free Designer's checklist to help you prepare for your first shopping trip. Get your free checklist, here.
Revive Old Planters with this Simple DIY!
'Tis the season to be sneezin' .. This Spring has got me suffering with allergies. Regardless, I am still spending time outdoors and finishing up outdoor chores before summer BBQ's start. Last weekend during Mother's Day, my mom and I went to pick out new flowers for outside (Mother knows best). As we prepare to plant the new flowers, I realized that our flower pots needed a major revival. It was only necessary that I stop everything I was doing and run to grab all my painting supplies.
Here is a Quick Step-by-Step Tutorial to Revive your Outdoor Planters:
For this project you will need:
A tarp to cover the ground, Paint of your choice (Either Spray paint or Acrylic), a ceramic or plastic pot, protective spray coat (optional), stencil (optional)
1. Wash & Scrub existing planter. It is important that you have a clean slate to work on. Wash away dirt and sometimes spider webs hidden under the lip of the planter (gross)
2. Place tarp down to protect the floor and ground around you.
3. Paint the body of your planter with two coats of paint in the color of your choice. You can leave it solid and stop here or use this color as a background color and move on to the next step.
4. (Optional) Apply a Stencil or tape out stripes or a design of your choice. Color in your stencil with paint.
5. (Optional) After the paint has dried, add a protective top coat.
Here is the final result. I may go back in and add a design to the Cobalt blue pot. I am thinking of a Chinoiserie pattern because I am loving Blue & White right now. If you haven't been following me, check out my post from two weeks ago, "Chinoiserie Chic Decor".

 I also painted a few solid yellow pots to coordinate with the sunflower stenciled pots which aren't photographed because I am waiting for my plants to grow. I didn't want to show you a pot of dirt :) I'll share the growth on Instagram @byamadesigns.
Here are some other Pinterest-worthy designs that I would like to attempt in the future.

(Photo via In my Own Style)

(Photo via Centsational Girl)
Gardening is not my forte. What are some of your favorite outdoor plants and flowers? Share your favorites (especially flowers deer & other animals won't eat). I would love to know!
I hope you enjoyed this post. If you love this post, share it with your friends and pin it to Pinterest to come back this craft idea later.
Hope your day is as awesome as you are! :)
Want more design tips? Join "The Designed Life" monthly e-magazine, filled with tons of inspiration for the home and life. Also, receive a free Home Design Checklist to make your next shopping trip for your home easier.
Design Trend: Blue Hues in Home Decor
Boy oh boy, do I have the case of the blues (not the boo-hoo blues)!! Shades of blue were introduced at High Point Market this Spring. In the fashion industry, Pantone may have announced "Marsala" to be the fashion color of the year but blue is the color of the year in furniture, accessories, and home decor as well. Today I will be sharing my inspiration and home decor in bright blues that you can add to your home and reinvent your space.

If you follow me on Instagram, I shared my inspiration of a vignette with vibrant blue plantation shutters and moroccan tile around it. Pigmented blue hues ranging from royal to indigo to watery azure are trending for this season on the runway and in home decor.
Introduce shades of blue to any decorating palette in doses or as the main focus. Blue plays well off of primary colors such as yellow or red for a bold impact. Pair blue with orange for a energetic color combo. On the contrary, couple blue hues with purple or green for soothing and cool palette. Blue could also serve as an accent color when paired with neutrals like the room featured below.
 (Photo via 6th Street Design School)
Whether you choose to add vibrant blue tones in big way or subtle way, I have found a few options that will suit your decor needs. Here are some blue decor ideas that you can incorporate into your home.

1. Silk Pillow // 2. Cobalt Table Lamp // 3. Porcelain Chinoiserie Vase // 4. Indigo Scarf // 5. Tufted Sofa // 6. Botanical Watercolor Art // 7. Hall Chest // 8. Ikat Rug
Did you find something you liked? Pin this image to your Pinterest board so you can shop later. Are you following me on Pinterest? Let's be friends :)
http://pinterest.com/byamadesigns/
For current photos of my work and progress photos, follow AMA Designs on Facebook or Instagram.
Want more design tips? Join "The Designed Life" monthly e-magazine, filled with tons of inspiration for the home and life. Also, receive a free Home Design Checklist to make your next shopping trip for your home easier.
10 Ways to Improve your Home's Curb Appeal
It is the perfect time of year to start working outside and improve the exterior appearance of your home. Whether your goal is to improve the attract buyers or to simply enjoy; the presence of your exterior will either welcome guests or deter them. In today's blog post, I will be sharing ways to create an exterior that everyone will want to know what is inside. Enhance your homes curb appeal with cosmetic upgrades and projects that can be done in one day or an entire weekend.
Here are 10 Ways to Improve your Home's Curb Appeal:
1. Statement Entry - The front entry is the focal point of your home. Create a statement entry by adding punch of color to your front door or by installing a custom wood door. Add a stylish Welcome mat and a decorative wreath to express your personality.

2. Replace Hardware - Update house numbers, the entry door lockset, and door bells/door knockers if they look worn from weather conditions or if they do not fit the aesthetic of your home. If you have a traditional home, oil rubbed bronze finish will work while brushed nickel suits more contemporary homes.
3. Mailbox - Select a mailbox that mimics the style and finishes of your home. A wall-mounted mailbox should compliment the color and trim of your home. Dress up a mailbox on a post by surrounding the post with flowers.
4. Lighting - Landscape lighting makes a huge impact when it comes to your homes curb appeal. It also provides safety and security. Illuminate pathways, spot light masonry details and trees, and an overhead light fixture by the entrance to welcome guests to the front door.

5. Paint - Define and highlight architectural elements by playing it up with a paint. Choose an accent color to accentuate decorative trim, railings, fences, columns, shutters, or other significant details that need more attention.
6. Renew Siding - Hire a professional or rent a machine to power wash the exterior of your home for a mini-face lift. If you're siding is in bad shape, repaint the exterior for an automatic transformation.
7. Balance and Symmetry - Creating balance is simple to arrange and also appeasing to the eye. For a stronger impact, try flanking sconces and/or planters on each side of the front door.

8. Renew Planter Beds - Renew planters beds and flower gardens by pruning and pulling weeds. Add new mulch to restore color that was taken away from sunlight and harsh weather. Define your planter beds by outlining them with stone or decorative cast-concrete edges.
9. Outdoor Seating - Add a bench or a few chairs to your front porch to make your porch feel more inviting and so you have another outdoor space to enjoy on a nice sunny day.

10. Outdoor Art - Add weather resistant artwork to add curb appeal and express your personality. Select sculptural elements that complement your homes's color palette and style. Water fountains, bird baths, metal sculptures, stained glass, and wind chimes are few good choices for outdoor art.
With a little TLC you can upgrade your home's curb appeal with cosmetic upgrades that can be accomplished in a day or a weekend. I hope this post encouraged you to update your home's exterior.
Did you love this week's post? Comment below and share with your friends. If you want more design inspiration and tips, please follow @byamadesigns on Instagram
Want more design tips? Join "The Designed Life" monthly e-magazine, filled with tons of inspiration for the home and life. Also, receive a free Home Design Checklist to make your next shopping trip for your home easier.
3 Tips to Create a Fab Foyer
The entry of your home is the first thing your guest see when you invite them into your home. As the saying goes, "First impressions are formed within 7 seconds." Create a lasting impression in your foyer that expresses your personality in a nut-shell. Show off your individuality but don't show all the goods ... shhh, save that for the rooms. My dream foyer would be packed with bold style, sexiness, gold accessories, lucite, a statement chandelier, and Mongolian fur ottomans. At least, that's what I am dreaming of right now - it changes.
This blog post was inspired by the powerful statement foyer that I found in the House Beautiful magazine (picture below). Isn't it drop-dead stunning? My eye was immediately drawn to the wallpaper. I love the citrus and blue tones in the pattern. Not to mention the pedestal table that literally was screaming my name.

Although the wallpaper is bold and in-your-face... the stair runner is neutral and creates a sense of balances. The solid gray grounds the space, giving your eye a place to rest. Next, is the gold pedestal base table; a stylish twist on a classic. It fills the corner nicely. The staircase is almost hugging the table. The accessories are simple and the florals draw your eye up towards the rest of the staircase and towards geometric pendant.
Are you anxious to learn how to create your own fab foyer? Inspired by the photo, there are three tips to keep in mind while designing your foyer. Let's break it down, shall we?
1. STYLE - Enter your home with style! Design your foyer by starting with largest item. Carpeting in most spaces will dictate the design. Stair runners and area rugs are a great way to introduce color and pattern into your foyer. Or opt to be different and add decorative wallpaper in your entry while keeping it neutral on with the carpet. Add a funky console table with a statement mirror above it. Reinvent an old table lamp and make it bold with a new lamp-shade. Strategically place florals, trinkets, picture frames, and other decor that will catch your eye as you enter the home.

2. PERSONALITY - You should feel welcomed every time you step foot inside your home. Add accessories and details that represent your personality and/or family. Whether it be pops of your favorite color, a traditional chair for putting shoes on, or that animal print rug you always wanted - get creative.

3. FUNCTION - Aside from being stylish and pretty, it has to be functional for your lifestyle. Place a small decorative tray on your console table for a spot to leave keys. Tuck away stools underneath your console that could easily slide out if you need to put your shoes on. Hang a decorative mirror for those last minute looks before you leave the house. Add a cute but functional Hall-Tree or hang hooks behind the door for your every day coats that are easy to grab-and-go.

I just realized that the acronym for these three rules is SPF! That should be easy to remember! :) Get your SPF on and rock on. For more inspiration to create a fab foyer of your own, please check out my "Fab Foyer" board on Pinterest.
https://www.pinterest.com/byamadesigns/fab-foyers/
What to do with A LOT of Wine Corks?
My family and I have collected wine corks over the years. Why? I'm not sure. We have so many wine corks that we could possibly build an addition onto our house... okay maybe not that much but we do have a lot.
So what do you do with all your wine corks?
Here is what I came up with:
1. A Cork Wreath to put on your front door so all your neighbors know you're a wine-o
Level: Medium-Hard
Directions: Cut out a wreath template using foam board, Use Gorilla Glue to glue on corks (hot glue gun doesn't work! the sun remelts the glue and made mine fall apart the first time around lol I've learned from experience), Add grapes and bows

2. Naughty and Nice Cork Ornaments
Level: Easy
Directions: Paint corks, add felt for clothes and hats, pipe cleaners for arms, the options are endless.

3. A Xmas Tree
Level: Easy
Directions: Make a pyramid of corks, glue one row at a time, paint some of the edges, add bow or star for a topper.

4. A More Complicated Christmas Tree (because one isn't enough)
Level: Hard
Directions: Honestly, this looks easier than it is. The beginning rows started off easy but the larger the base got - the harder it was. I glued rings of corks together in different sizes, then glue each row together to make a stacked row tree.

I hope you enjoyed this post! I can't wait to see what you come up with! Please tag your creations on Instagram or Twitter @byamadesigns. I will repost all my favorites :) Happy holidays everyone!
Warmest wishes,
Amanda M. Amato
AMA DESIGNS