


I have a list of destinations that I want to travel to. First destination on my bucket list was Italy to explore my culture and get back to my roots. I went on a tour for a week (wish it was longer) and I spent 2 nights in Venice, 2 nights in Florence, and 2 nights in Rome. I wanted to share some of my favorite highlights from the trip. Since I have returned, I have received a lot of questions asking, "Which city was your favorite?" That is such a difficult question to answer because each city has a different vibe and atmosphere. Venice was romantic. Florence had great places to shop and pizza. Rome had great history. Well, all three cities had history but ... the Colosseum and the Pantheon had me mesmerized.
New Year, New Beginnings
It's been a while since I have posted but I will fill you in on all the juicy details. This year started off with a BIG surprise.. but before, I get into the details, let me give you the background. For about 6 months, I had planned a trip to Italy with my boyfriend. I have never been abroad before and it was on my bucket list to visit Italy. I wanted to experience my culture and go back to my "roots". My trip was planned the week of Christmas and New Year's Eve, so that means I would be away from family and friends for the holidays. Being away for Christmas is a big deal, especially for an Italian household where Christmas Eve and the seven fishes is a big deal, a really big deal.
So to make it up to my family, I had promised to get the family together for a pre-holiday celebration dinner before I went away on vacation. We got my boyfriends family and my family together for a big meal hosted at my boyfriend's brother's house. To my surprise, my boyfriend had other ideas in store.
6 Easy Holiday Decorating Tips
If you are anything like me, you may be looking for easy holiday decorating tips because this time of year is always so hectic! As much as I would have liked to full-out decorate, I didn't have time to deck the halls. Between holiday shopping, gift exchanges, parties, worrying about what to cook/bring to the party, weddings, client meetings, packing, and traveling.. my head was spinning! Hence why, I wanted to keep the decor simple! Today, I will be sharing my 6 decorating tips to recreate my simple yet elegant look. The theme of my decor this year is: silver, gold, and mirrored accents. With a few key pieces, you can recreate the look with these 6 easy holiday decorating tips.
6 Easy Holiday Decorating Tips
- Decorative Trays: Why I love them? Because they are super versatile and create groupings for collections. I love these pair of brass and mirror trays from 33rd Floor Decor (great price too!). I dressed up my buffet with two drays; one for decor and the other to display drinks and champagne flutes.

2. Festive Mirrors: I love incorporating mirror into my holiday decor because when the holiday lights are twinkling, and it reflects in the mirror it creates a whimsical effect. I got this lovely starburst mirror from 33rd Floor Decor.
3. Natural Elements: A simple faux tabletop tree sits on top of my buffet this year. I like to incorporate greenery and natural elements into my designs for a pop of color and texture. I didn't have a chance to get my tree yet, but the tree clippings are good to save and display in a vase. For a more natural look, you can sprinkle pinecones on your table or mantle (love the cinnamon scented cones).
4. Candles: This almost goes without saying, but candles are key for setting the mood. I placed candles on decorative mirrored trays to reflect the light. When the lights are dimmed, it almost feels magical.

5. Mercury Glass: Mercury glass candles holders or hurricane vases look beautiful when candles are on or off. The reflective antique mirror-esque sheen creates an elegant touch to any area of the home.
6. Garland: Garland is essential for holiday decorating. Whether you are using real garland or faux (like I did), it completes the entire look. I am loving these silverleaf berry branches that I got from Target. They are wire branches so they can bend and twist as you wish.
I hope you have enjoyed these easy holiday decorating tips. How will you decorate for the holidays? If you have used my tips, please post a photo and tag @byamadesigns .. I would love to see your creativity!
Want more decorating tips?
- Follow @byamadesigns on Instagram for daily design inspiration!
- Join our Monthly E-Magazine: The Designed Life for decorating tips and inspiration
7 Last Minute Thanksgiving Hosting Tips
Thanksgiving is this week, are you prepared? In today's blog post, I am sharing 8 Last Minute Thanksgiving Hosting tips to turn you into The Hostess with the Most-est! Even if you are fully prepared for your feast, here are a few simple ways to elevate your guests dining experience.
7 Last Minute Thanksgiving Hosting Tips
An Autumn Entry: Decorating the front door is often forgotten. Simply hang a wreath on the front door for an inviting an festive entry to welcome your guests into your home. For a Fall Wreath tutorial, check out the burlap wreath that I had made.
Festive Cocktail Hour: Start of the the party with one of my favorite seasonal drinks, a Honeycrisp Apple Sangria. Spice up your regular sangria with cinnamon sticks. Follow the recipe featured on Sally's Baking Addiction.

(Image via Sally's Baking Addiction)
Fall Flower Arrangement: Dress up your table with with a Fall Centerpiece. For casual dining, create a simple flower arrangement with autumn flowers. When you are ready to serve the food, you can easily remove the centerpiece to make space or if you would like to keep it on the table during the meal - make sure it is low enough for guests to see each other.
Create your Own Place Cards: Whether you are hosting a formal or casual Thanksgiving, place cards are great to have at any type of gathering. Avoid the award “Where do I sit?” moment. Create your own last-minute place card setting by editing the template provided by Blooms Designs. Visit the link to create your own place cards.

(Image via Bloom Designs Online)
Share Why Your Thankful: On the Back of the place card, encourage your guests to write why they are thankful for, besides Turkey. You can take turns going around the table to read what you are most thankful for.
Simplify Hosting Duties: As the host, often times we are caught up in the kitchen, catering to guests, and tending to the party. The best way to enjoy your company is to keep your hosting duties light so you can enjoy the party too. Here are two ways to serve food:
- Buffet style - Set up a feast near the table and allow guests to help themselves to their favorite Thanksgiving foods.
- Family Style - Serve dishes family-style, allowing guests to interact and share much more than a buffet does. Set the table with large serving dishes and serving spoons down the table and let guests pass them along during the meal.
Save Room For Dessert: Since most of us will be eating more than what we are typically used to (or at least in my family), it's important to save room for dessert because Grandma makes the best pie and you can't miss out on all that goodness! If you want a light dessert, consider making these fruit cone-copias featured on Target's blog (along with some other great treats).

(Image via Target)
Overall, Thanksgiving is about spending time with your loved ones and appreciating the people and the abundance around you. Regardless of how your table is decorated, everyone will still have a great time... even if your Turkey comes out dry. I hope that you have found these tips helpful and incorporate at least one example during your feast.
Wishing you the happiest Thanksgiving with tons of love, laughter, and memories.
Enter to Win Interior Design Advice
Before you go, don't forget to enter the AMA GIVE THANKS GIVEAWAY. You have 3 Days left to enter to win Free Interior Design Advice. One lucky follower will be chosen. Winner will be announced on November 25th, at 1:00 EST.
To enter to win, you must be following @byamadesigns on Instagram. Click here for the details.
10 Centerpiece Ideas for your Fall Table
Autumn is my favorite season so I thought I would share centerpiece ideas for your Fall table. In northern New Jersey, the fall weather gives us a break from the summer heat and it’s just cool enough to enjoy with a light weight jacket. As we enter into November, it is time to remove the spooky Halloween decorations and update your homes decor with items that feel festive for fall. Today I have curated my top ten favorite centerpiece ideas that I have found on Pinterest to spice up your Autumn table.
10 Centerpiece Ideas for your Fall Table
- Pumpkins - This goes without saying but what is Fall without a pumpkin? The feeling of fall simply wouldn’t be present without an orange pumpkin or two. Gather and arrange a few pumpkins in the center of your table with a burlap table runner and branches for a rustic tablescape.

(Image via A Glamorous Housewife)
2. Gourds - Can’t forget about gourds. The shapely and colorful veggie is the combination of color and texture to add to any Autumn table arrangement.
3. Indian Corn - Bundle together Indian corn with burlap or twine to create an easy yet classic centerpiece. Incorporate a few dried flowers and cranberry branches to complete your centerpiece.
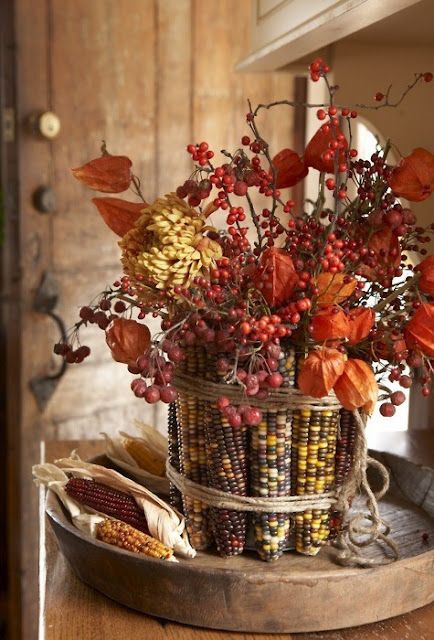
(Image via Kristens Creations)
4. Popcorn Kernels - Fill a Hurricane Vase with loose popcorn kernels about halfway, then add an ivory pillar candle to create a neutral fall centerpiece
5. Leafy Branches - Do you have a beautiful colored tree in the backyard? Cut off a leaf-filled branch and place in a vase for the easiest fall centerpiece. If you don’t have access to the outdoors, your local craft store will have some faux branches that you could use instead.
6. Autumn Filled Crate - Create an easily moveable centerpiece by filling a crate or basket with Autumn scented candles, leaves, branches, pumpkins, and whatever else that has the essence of Fall.
 (Image via Molly One)
7. Log Votive Holder - Turn a log into a beautiful votive candle holder. This one requires help or you can find and purchase similar on Etsy.
8. Fall Candles — Wrap candles with burlap and place a single faux leaf on the ribbon for a simple fall accent
9. Dried and Layered Veggies - Layer dried veggies in a glass hurricane vase to make a fall colored centerpiece. Fill the vase about halfway, and then add a pillar candle in a coordinating color to complete your centerpiece
10. Pumpkin Vase - Skip the carving. Spray Paint pumpkins white and hollow out the center to hold a cup of fresh flowers. This is ONE of my favorite - so sophisticated and adds a twist to the traditional pumpkin centerpiece. This can also be achieved with a plastic pumpkin (either find a white one or spray one), and then apply a foam cushion to the top so you can insert faux silk flowers in the colors of your choice.

(Image via Chatelaine)
I hope you have enjoyed these 10 simple centerpiece ideas for fall. Which one was your favorite? Which idea are you going to attempt for your autumn table?
10 Ways to Make Your Home Look New at No Cost to You
What if I told you that it was possible to make your home look new at no cost to you and that you didn't have to buy anything new to decorate your home? You might be thinking, "that's a first! A designer who told me not to buy anything." Well, it's true! In today's post, I will be sharing 10 ways to make your home feel new at no cost to you.
Over the years, we tend to collect a lot of "stuff", some questionable items but mostly good stuff. When new stuff enters the home, we often forget about the old stuff or it gets packed away. I encourage you to revisit your archives and reinvent your space with these ten decorating tricks.
10 Ways to Make your Home Look New at No Cost to You
- Gallery Wall: Create a photo or gallery wall by displaying photographs that have been left out of rotation for a while. Now is the time to let your old photos have a chance to shine. In order to have a successful gallery wall, it is important to have unity or one similarity that makes the images cohesive. When considering a grouping, you can have matching frames or all the same picture tones (sepia, black and white, etc.) BONUS TIP: Refresh your favorite picture frames but adding matting. Matting a photo adds visual dimension and allows the eye to focus directly on the image. Matting separates the decorative frame from the photo which allows the photo to be the centerpiece.
- Rotate Art Work: Swap out artwork. Do you have a favorite art piece displayed in another room? Try moving it to a new area of the house that you can enjoy more frequently. Or maybe you have a piece of artwork that is stored away, now is the time to put it on display.
- Rearrange your Room: Sometimes, rearranging your furniture and making simple tweaks to your space is a way to make it feel new again.
- Update your Bookshelf: Refreshing your bookcase is a project within itself. It's best to start off with a clean slate (literally). Take everything down and put in a good dusting. Mix in trinkets, artwork, photos, decorative plates on stands, foliage, and other items that interest you in your bookcase. I like to rotate book orientation by placing books vertically or a short stack horizontally with an memento on top. It takes time to get it just right but adds so much more interest to your bookcase. BONUS TIP: Want to make your items stand out?Add a pop of color with wallpaper by applying it to the back of a bookcase.
- Eye Candy for your Coffee Table: Accessorizing your coffee table is one of the areas you can express your interests and personality. Update your coffee table with your favorite books (maybe one that is too big for the shelf). Add unexpected pieces to your coffee table that add character and texture. Vary objects of different heights to add visual interest. This includes something tall like a vase or floral arrangement. Something short and horizontal such as a stack of books with a decorative object on top. Something sculptural to add texture and interest. BONUS TIP: If you own an ottoman instead of a coffee table, try adding a decorative tray for a hard surface to add decor and/or place down drinks. Trays also keep remotes and other items organized.
 (Inspiration Image via The Every Girl X Minted)
 - Create a Centerpiece: Create a new and unique centerpiece. A centerpiece does not always have to be flowers, it can be something sculptural. It could be a grouping of glass hurricanes, a piece of driftwood, an ornate lantern, or even a sculpture to create a focal point on your table.
- Bring the Outside In: Walk around your backyard and bring in elements of nature into your home. Fresh flowers or tree branches in a vase are just two ways to bring the outside in. Another way to bring an organic element into your home is to collect river rocks (this will require some searching) and place them on an elongated tray with tea-light candles for an intimate centerpiece.
- Enjoy Outdoor Furniture Year Round - Get the most use out of your outdoor items by bringing outdoor furnishings into your home. Outdoor furniture is nearly indestructible. Wrought iron, wicker, sisal rugs, and garden stools look just as fabulous inside as they look outside.
- Spice Up your Furniture: Update furniture that is out of date. Breath life to worn furniture by giving it a fresh coat of paint. Give an old chair a modern facelift by adding a pop of color or a trendy seat cushion for a modest change that can be swapped out. Revive a chest of drawers with new decorative hardware. Search around your home for items that are tired and that can be reinvented.
- Pull from Other Rooms - Rearrange accessories and rotate items throughout your home. When we see an item everyday, over time we start to not see it anymore. Rotate your accessories into new areas of your home so you can fall in love with it all over again. BONUS TIP: Switch lamps shades with other shades (if the sizes are similar) around your home to make your lamp feel new again. A quick way to update any lamp.

(Inspiration Image via Studio McGee)
..and there you have it! Ten ways to decorate your home feel new at no cost to you! Which tip was your favorite? How can you reinvent your room? I'd love to hear from you. Leave a comment and let me know which tip was your favorite.
Want more design tips and inspiration?
- Follow me on Instagram! @byamadesigns
- Join me in FREE Webinar! I will be hosting a Live Master Class on Space Planning. Reserve your seat!
- Sign up for my VIP List and receive inspiration each month
How to Budget for your Design Project
[contact-form][contact-field label="Name" type="name" required="true" /][contact-field label="Email" type="email" required="true" /][contact-field label="Website" type="url" /][contact-field label="Message" type="textarea" /][/contact-form] Whether you have $1,000 or $100,000 to spend on your decorating project, it is important to learn how to budget for your design project. The number you determine as your budget will be the figure you reference to when making decisions. Decorating on a budget doesn't have to mean being cheap , it means being a savvy shopper and finding the best value for your buck.
The topic of "budget" is one of the most uncomfortable conversations to have with a client but it doesn't have to be overwhelming. It can be fun! Come up with a "wish list" of all the items that you would like to incorporate into your new space. Let's say you have an office and it is your dream to have custom built-ins. Now, let's get practical. Reflect back at your budget and consider your options. Does custom built-ins fit in the budget? Would it be more appropriate to opt for free-standing bookcases or decorative etageres? This way you are indulging but still maintaining a realistic outlook when it comes to making important decisions.
(Photo via Style Curator)
How to Budget for your Design Project
- Evaluate Finances: First, it is important to evaluate your finances. This means looking at your monthly inflows and outflows, as well as the funds you have set aside for your project. Assess your finances and determine what is the number that you can realistically spend on your project. At the end of the day, this number should be the amount that you are happy to spend on your project without feeling guilty or stressed.
- Get to Know the Cost of Items: The next step is to familiarize yourself with price tags and learn how much things cost. Is this your first time decorating or the last time you had decorating was 10 years ago? Whether it is your first time shopping or if you have past experience decorating your home, expect some sticker shock. Prices in the market place inflate over time.
- Get Quotes from Professionals: The last step to finalizing your budget is determining the jobs that you would be hiring a professional to handle. This can include hiring a decorator, contractors, electrician, plumber, painting contractors, wallpaper installers, and flooring installers. I suggest getting two or three quotes for each job so you can make an educated decision before finalizing your budget. Do you think you are handy and can handle a project by yourself? Consider DIY costs for supplies and several trips running back to the hardware store and late night spent at labor. Sometimes that pro-quote doesn't seem so bad after all!
PRO TIP: Leave yourself some financial wiggle room for mistakes and miscellaneous expenses incurred such as: Freight and Delivery Charges. These can be substantial especially for large items but even smaller items that are purchased online can add up too!
(Image via House of Jade)
Organize your Information
- Create a list of all the items and professional services that are necessary for your project
- Next to each line item, list the estimated price next to each item
- Create a second column for the cost that you actually have spent so you are aware of how this affects your bottom line
Create a Plan
Based on your list, determine the items and services that will need to occur in chronological order. What needs to be ordered first? What needs to happen before the furniture arrives? When should you hire your painter? etc.
Based on your finances, if you aren't able to purchase everything right away; spread out the expense by making it a long term plan and implementing your design in phases as time and money allows. Phasing a project is the best way to go if you have high standards but not as much money. Working in phases is also good so at least your whole house isn't *under construction* or *in progress*. By doing one room at a time, this allows you to spend time in other parts of the house during a project.
Want more design tips and inspiration?
- Follow me on Instagram! @byamadesigns
- Sign up for my VIP List and receive inspiration each month
The Designer behind AMA Designs
Hello my friends, since I noticed new followers, I thought I would share a little about myself and the designer behind AMA Designs.
Tell us About Yourself
My name is Amanda. I am from New Jersey and I am the Owner of AMA Designs & Interiors LLC. Interior design has always been a passion of mine. Since I was a little girl, I was always surrounded by design. My family owned a construction business for several years. My Father and Grandfather would show me blueprints and I learned to draw in their trailer. Some of my earliest memories were of me on the job-site fascinated by the capacity of the buildings and the large machinery.
When I went on play dates, I was more interested in designing the Barbie Dream House. It's funny to look back at those early beginnings of me designing Barbie's dream home to designing my client's dream homes. The feelings haven't changed.
I continued my education at Berkeley college where I graduated with a Bachelor degree in Interior Design and Management. My internship was at an International wallpaper company where I had the opportunity of collaborating with the product development team to design the patterns for wallpapers that are available for the home today (super cool).
I moved on from product design, to residential interiors because my passion is to help others. I believe your home is your sanctuary and should reflect your unique personality. I help people find their style and OWN it.
What People Don't Know About Me
I am extremely organized. When my desk is in a disarray, I simply cannot focus. When everything is scattered, my thoughts are scattered. I am *that* girl who can't walk by a picture frame that is hung slightly crooked on the wall without having the urge to fix it. I have a slight obsession with post-it notes and I color-code everything, mostly because I just enjoy the pretty colors on my paper ;) I am so Type A personality and I attribute that to my success as being a solo-preneur.
I actually got my first "job" organizing other people's closets when I was in middle school. It was during a play date (not typical for average children), and I opened the closet and saw all the toys tumble out of it... and I asked, "Why is this here? It would be so much better like this..." and from there, boom, entire closet organized. Let me just say, all the moms started to call me to come over to their house.
What do I do when I am not designing?
This is a trick question. I feel like I am always designing or at least thinking about it. When I visit a new place, I am instantly drawn to the details. I notice things that most people don't. For example, when I goto a hotel, I remember what floor I am on because of the color of the carpet (Side Note: I actually got lost in Atlantic City with my friends and I helped find our way back to the room because I remembered the colors of the carpet and wallpaper pattern).
But to answer the question, when I am not designing; I simply just like to chill. I am such a homebody. The low-key nights having a glass of red wine with my boyfriend, friends, or family, really make me happy. My mind is always turning wheels during the day so when I have a moment to simply relax and enjoy the moment .... those are the best moments for me.
Other activities that I like to enjoy during my spare time are: hiking, yoga/hot yoga, running, snowboarding, painting, and crafting.
Giving Back to the Community
Volunteering my time to help out in the community is very important to me. Someone recently asked me, "Why is giving back so important to my business model?" For me, giving back and volunteering to help others is a no-brainer. My first taste of volunteering my design services was over 6 years ago, and I have continued ever since. My work is so gratifying on many levels. Since I was little, I always dreamt of having a career in which I would help people. I believe your home has an energy, it lifts you up when you are down, and it is there to welcome you after a long day. Everyone deserves an environment that they feel inspired to be in. To be able to bring this experience and share with others who may not have the financial ability to achieve it themselves, is incredibly rewarding. This may sound corny, but seeing the happiness on other peoples faces, makes me happy, and I LIVE for that!
I not only volunteer my design services but I also volunteer with the homeless youth at Covenant House locations. Volunteering with young people and listening to their stores, brings me back down to my roots and strips me down to the bare bones of what is truly important in life. Connecting with these beautiful young people brings me experiences that I will never forget.
What do I have planned for the future
In the near future, I will be launching my first EVER Online Course. I will be launching an e-course to teach homeowners the fundamentals of Interior Design so they can decorate their room from start to finish. I created this course to help the homeowner who needs the design help but may not have the ability to hire a professional designer. Leading up to my launch, I will be hosting Live Webinars so stay tuned... Reserve your seat here.
In five years, I plan to expand my design business and to have my own team of creative individuals. At this time, I would like to explore creating a line of products for the home including decor, fabrics, and furnishings.
I hope you found my story interesting. Want to know more about me? Ask me a question. I would love to hear from you.
Stay connected with me and all things design by following me on Instagram!